Breville is a brand synonymous with quality and innovation in the coffee industry.
Among their impressive lineup, the Barista Express stands out as a favorite for coffee enthusiasts worldwide.
Renowned for its exceptional features and user-friendly design, this model offers a seamless transition from bean to cup, ensuring a barista-quality espresso in the comfort of your home.
Join us as we delve into the art of mastering the Breville Barista Express, guiding you through every step to achieve the perfect espresso shot.
Getting Started with Your Breville Espresso Machine
Embarking on your journey to exceptional home-brewed espresso begins with setting up your Breville machine.
Here’s a step-by-step guide to get you started on the right foot.

Unboxing and Initial Setup
Upon receiving your Breville espresso machine, carefully unbox and remove all packaging materials.
Inside, you’ll find the espresso machine itself along with various components such as the portafilter, steam wand, and a collection of filters.
Lay out all the parts on a clean surface to ensure nothing is missing.
Place your machine on a stable, level surface near an electrical outlet, and make sure there’s enough space around it for easy operation.
Cleaning Before First Use
Before you brew your first cup of espresso, it’s crucial to clean your machine thoroughly.
Start by washing the removable parts, such as the water tank, portafilter, and drip tray, in warm soapy water.
This removes any residue from manufacturing and packaging.
Rinse these components well and dry them before reassembling the machine.
Wipe down the machine’s exterior with a damp cloth to remove any dust.
Installing the Water Filter
Your Breville espresso machine comes with a water filter designed to purify the water before brewing.
Soak the filter in water for about 5 minutes, then rinse it under cold tap water.
Insert the filter into the filter holder and place it in the water tank.
This step is crucial for reducing impurities and preventing scale buildup, ensuring your coffee tastes fresh every time.
Flushing the Machine
Before brewing your first espresso, it’s important to flush the machine with water.
Fill the water tank with fresh, cold water and turn on the machine.
Use the “1 cup” and “2 cup” buttons to run water through the group head and steam wand.
This process ensures any manufacturing residues are removed and the machine is preheated for optimal brewing temperature.
Importance of Reading the Manual for Specific Model Instructions
Each Breville espresso machine model comes with its unique features and settings.
While the setup process is generally similar across models, specific instructions, such as programming the water hardness or adjusting the grind size, can vary.
Take the time to read the manual thoroughly to familiarize yourself with your machine’s capabilities and maintenance requirements.
Understanding these details will help you get the most out of your Breville espresso machine and enjoy delicious espresso for years to come.
Understanding Your Breville Espresso Machine
To master the art of espresso with your Breville machine, it’s essential to get acquainted with its key components and understand how to prepare it for use.
This knowledge lays the foundation for brewing the perfect cup of coffee.
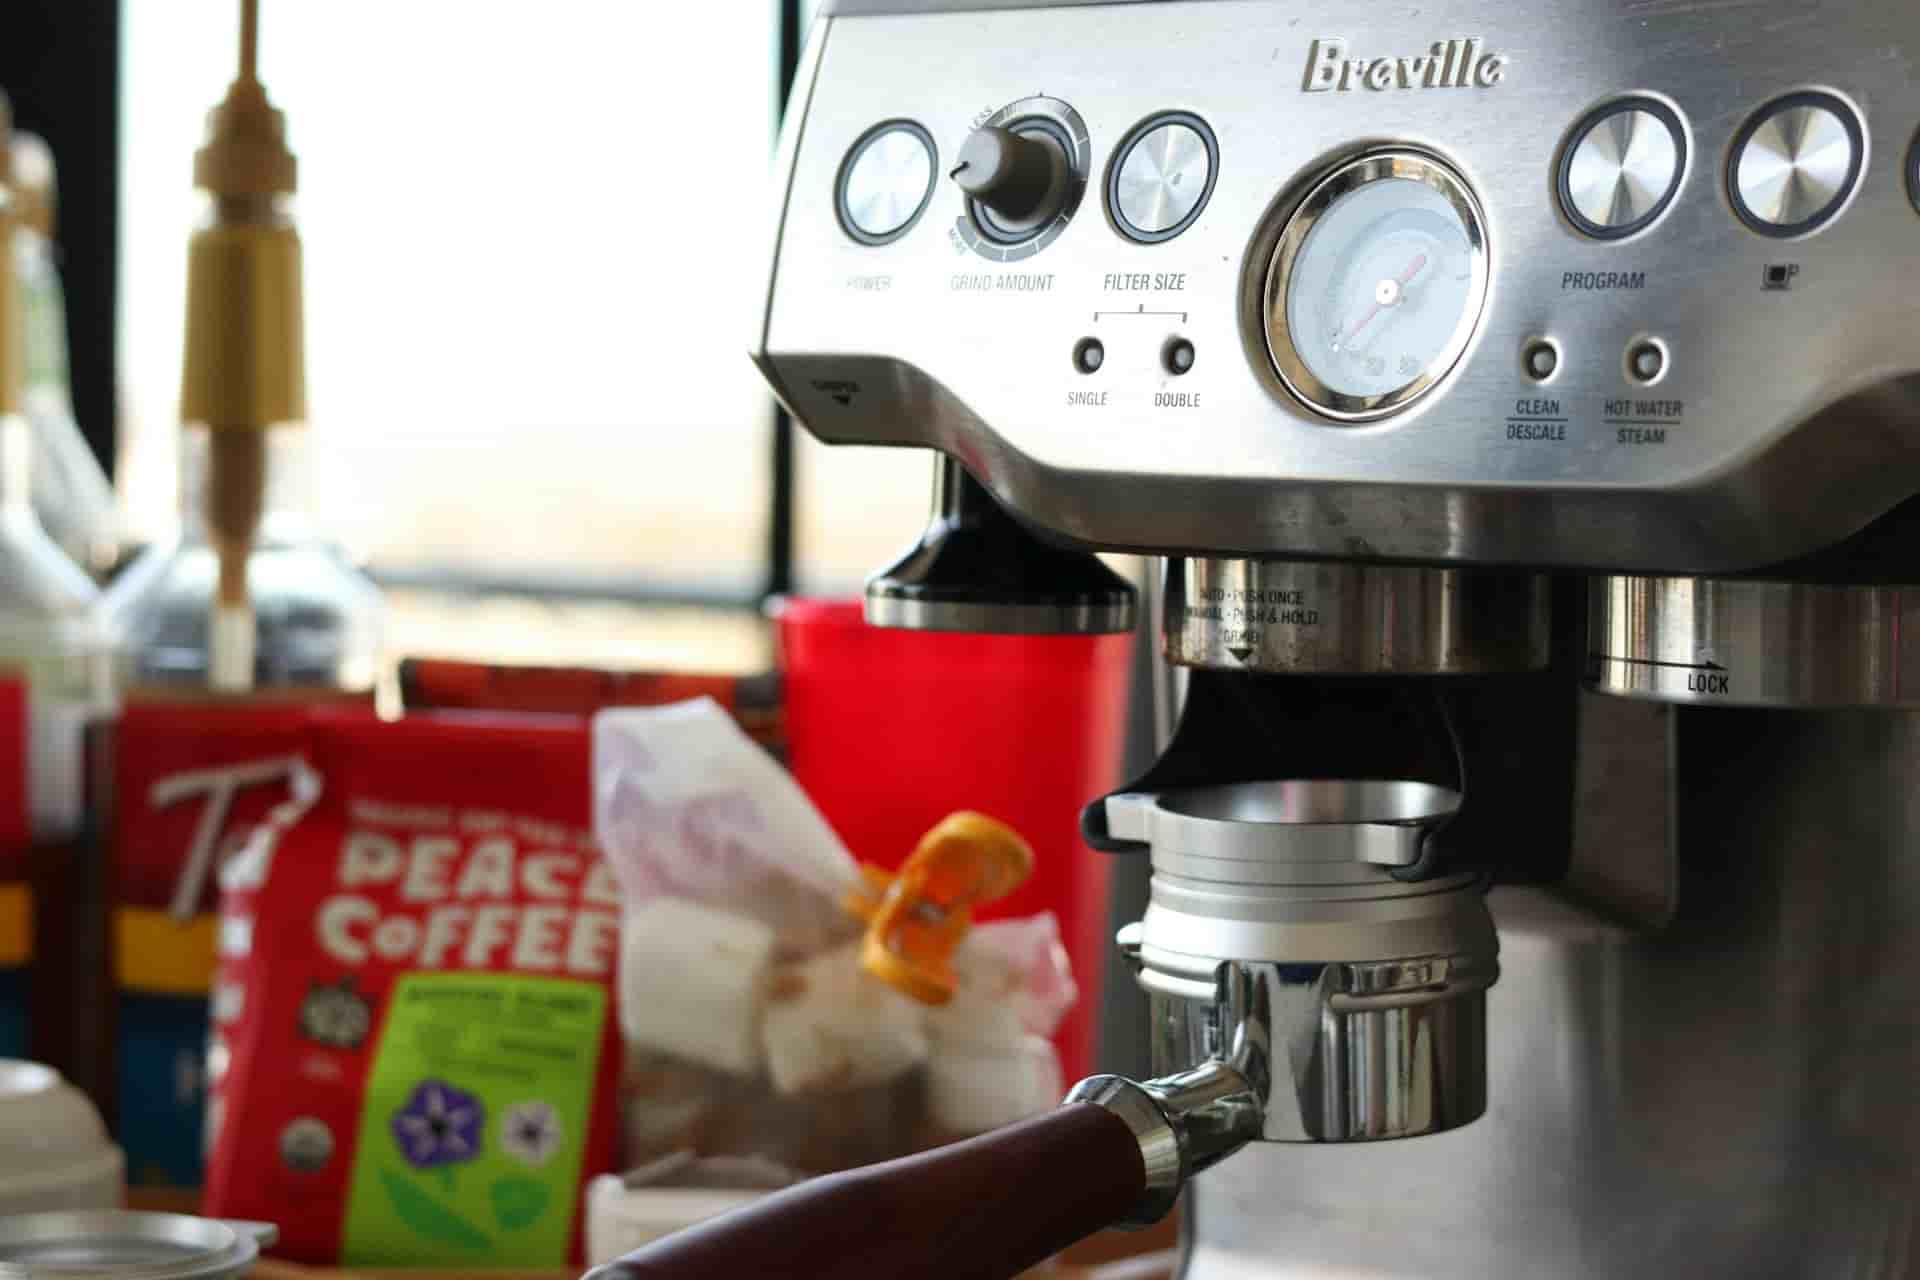
Overview of Key Components
- Water Tank: The water tank is where you fill the machine with water. It’s typically located at the back or side of the machine and is removable for easy filling and cleaning. The quality of water you use significantly affects the taste of your espresso, so consider using filtered water.
- Portafilter: This handle with a metal filter basket is where you place the ground coffee. After filling it with the right amount of coffee, you’ll lock the portafilter into the group head of the machine to brew espresso.
- Grinder: Many Breville espresso machines, like the Barista Express, come with an integrated grinder. This allows you to grind coffee beans directly into the portafilter. The grind size is crucial for espresso extraction and can be adjusted to achieve the perfect shot.
- Steam Wand: Used for frothing milk, the steam wand is a powerful tool for making lattes, cappuccinos, and other milk-based espresso drinks. It releases steam at high pressure, creating microfoam by introducing tiny air bubbles into the milk.
How to Fill and Install the Water Tank
- Remove the Water Tank: Gently pull the tank from its compartment. If it’s your first time, refer to the manual to avoid any damage.
- Fill with Water: Use cold, preferably filtered water to fill the tank up to the indicated maximum level. Avoid overfilling to prevent spillage.
- Reinstall the Tank: Carefully slide the water tank back into its original position until it’s securely in place. Ensure it’s properly aligned and locked to avoid any leakage during operation.
Preheating the Machine for Optimal Temperature
Preheating your Breville espresso machine is crucial for achieving the ideal temperature for espresso extraction.
Follow these steps to ensure your machine is ready to brew:
- Turn On the Machine: Power on your espresso machine by pressing the designated button. This will initiate the heating process.
- Wait for the Machine to Heat Up: The machine will take a few minutes to reach the optimal brewing temperature. Some models have an indicator light that turns on or stops blinking when the machine is ready. We recommend waiting about 15 minutes to let the machine heat up fully.
- Run a Blank Shot: Without adding coffee to the portafilter, lock it into the group head and run a shot of hot water. This not only preheats the portafilter and the cup (if placed beneath the spout) but also ensures the machine is at the perfect temperature for extracting espresso.
Preparing the Coffee
The journey to a perfect espresso starts long before the coffee meets the water.
It begins with the right beans, moves through the grinding process, and ends with the perfect tamp.
Here’s how to navigate these crucial steps.
Selecting the Right Coffee Beans
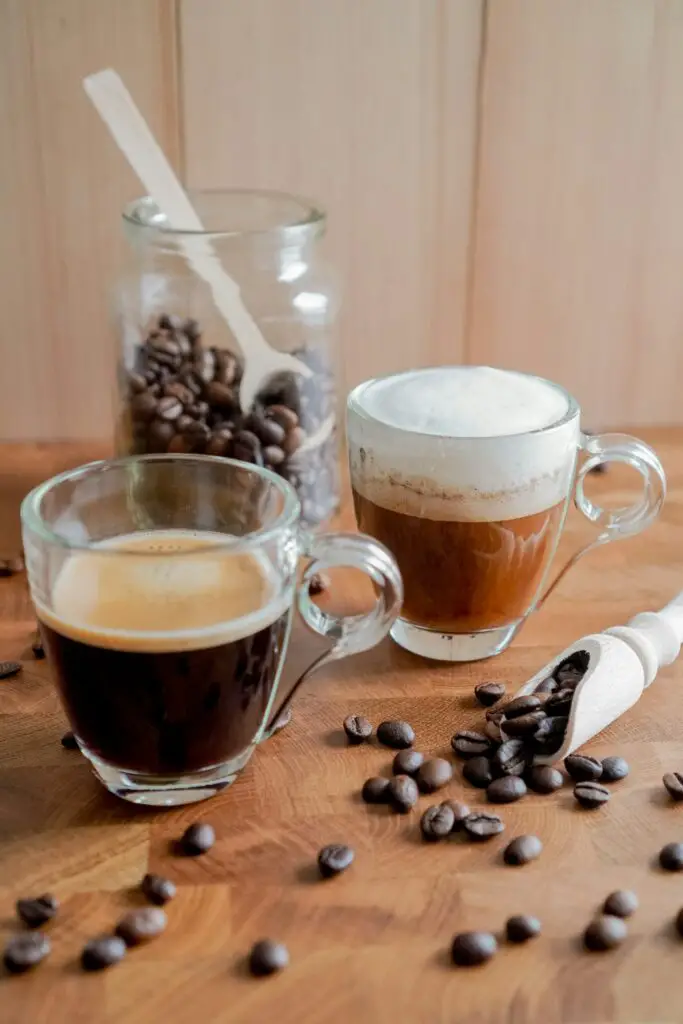
- Freshness: Freshness is paramount when it comes to coffee beans. Ideally, use beans that have been roasted within the past two weeks. Fresh beans ensure the fullest flavor and a rich crema on your espresso.
- Type: While personal preference should guide your choice of beans, for espresso, a medium to dark roast is typically preferred due to its robust flavor profile. Single-origin beans can offer unique tasting experiences, but blends are often designed to provide the balance and consistency prized in espresso shots.
Using the Built-in Grinder
Your Breville espresso machine’s built-in grinder is a key feature that sets it apart.
Here’s how to make the most of it:
- Fill the Hopper: Add your chosen beans to the hopper. Ensure the hopper is clean and dry before adding the beans to avoid any old grounds affecting the taste of your espresso.
- Adjust for Quantity: If your machine has a dial or setting for the amount of coffee to grind, start with the recommended setting for a single or double shot as indicated in your machine’s manual. You can adjust this based on your preferences over time.
Adjusting Grind Size and Amount
- Grind Size: The grind size is crucial in extracting the perfect espresso. It should be fine, but not so fine that it clogs the machine. Most Breville machines offer a range of grind settings. Start in the middle range and adjust based on the shot quality. A finer grind increases extraction, deepening the flavor, while a coarser grind decreases extraction.
- Amount: The right amount of coffee is typically around 18-20 grams for a double shot. Your machine’s grinder should be set to dispense this amount, but you may need to adjust based on the specific beans and your taste preferences.
Importance of Fresh Grinding for Flavor
Grinding your beans fresh for each shot is crucial for capturing the coffee’s full flavor profile.
Once ground, coffee begins to oxidize and lose its flavor rapidly.
By using the built-in grinder, you ensure the freshest, most flavorful espresso shot.
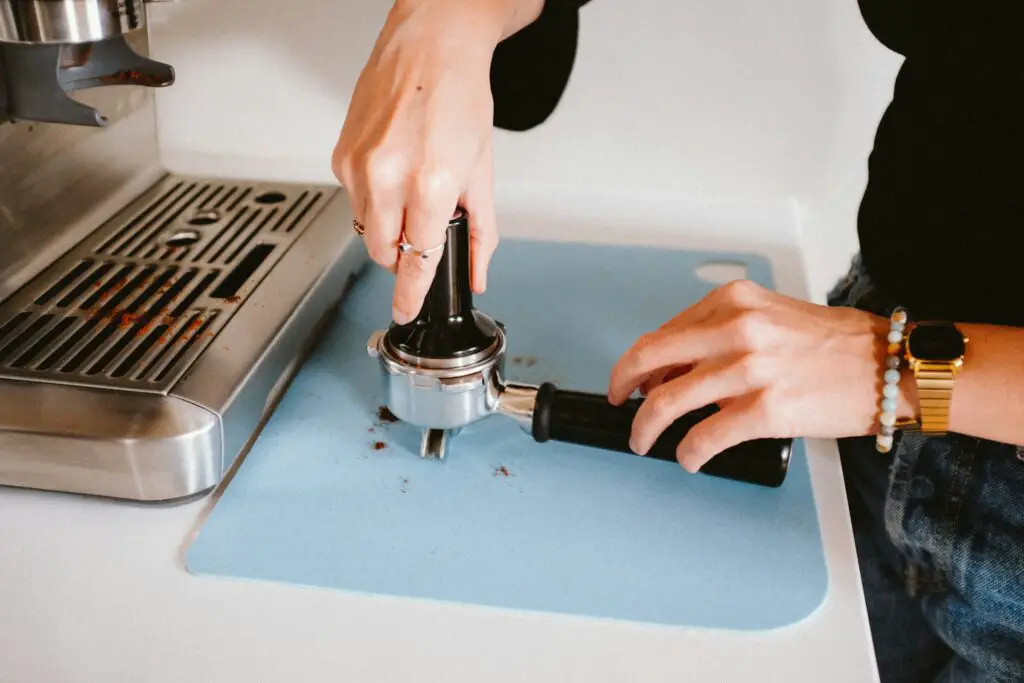
Tamping the Coffee Grounds Properly
Tamping compresses the coffee grounds, ensuring an even and optimal extraction.
Here’s how to tamp correctly:
- Fill the Portafilter: After grinding, ensure the coffee grounds are evenly distributed in the portafilter.
- Press Firmly: Using a tamper, press down firmly on the grounds. The pressure should be even and strong, around 30 pounds of force. This creates a smooth, flat surface.
- Twist Finish: After pressing down, give the tamper a slight twist. This helps seal the grounds and prevents water from channeling through weak spots during extraction.
Proper tamping is essential for a balanced extraction, preventing water from passing through the coffee too quickly or slowly.
It’s a skill that improves with practice and is vital for achieving the perfect espresso shot.
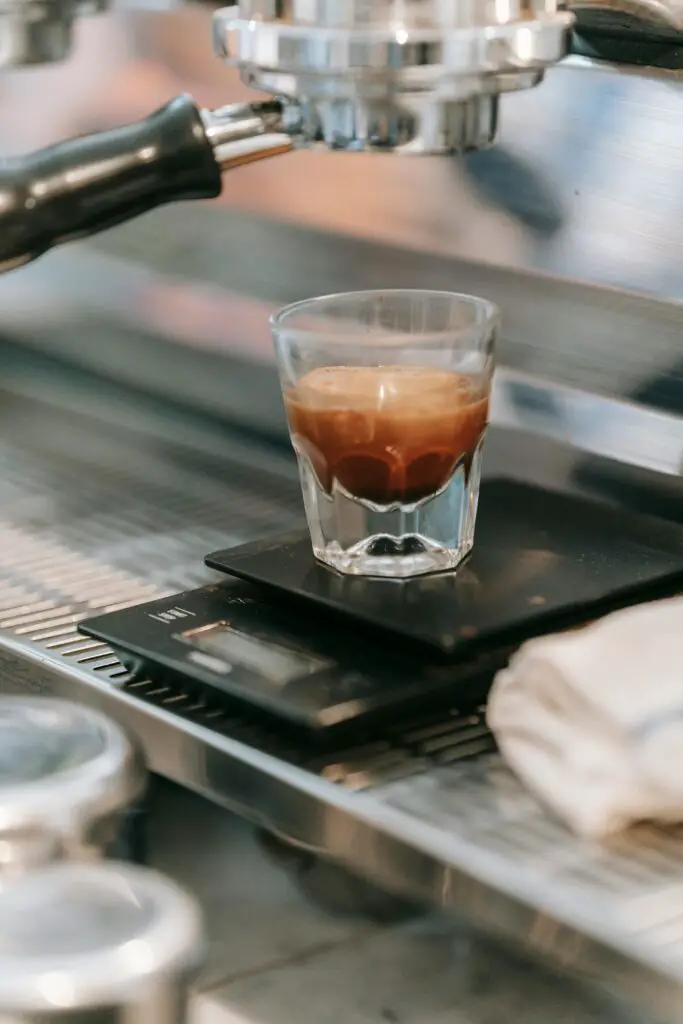
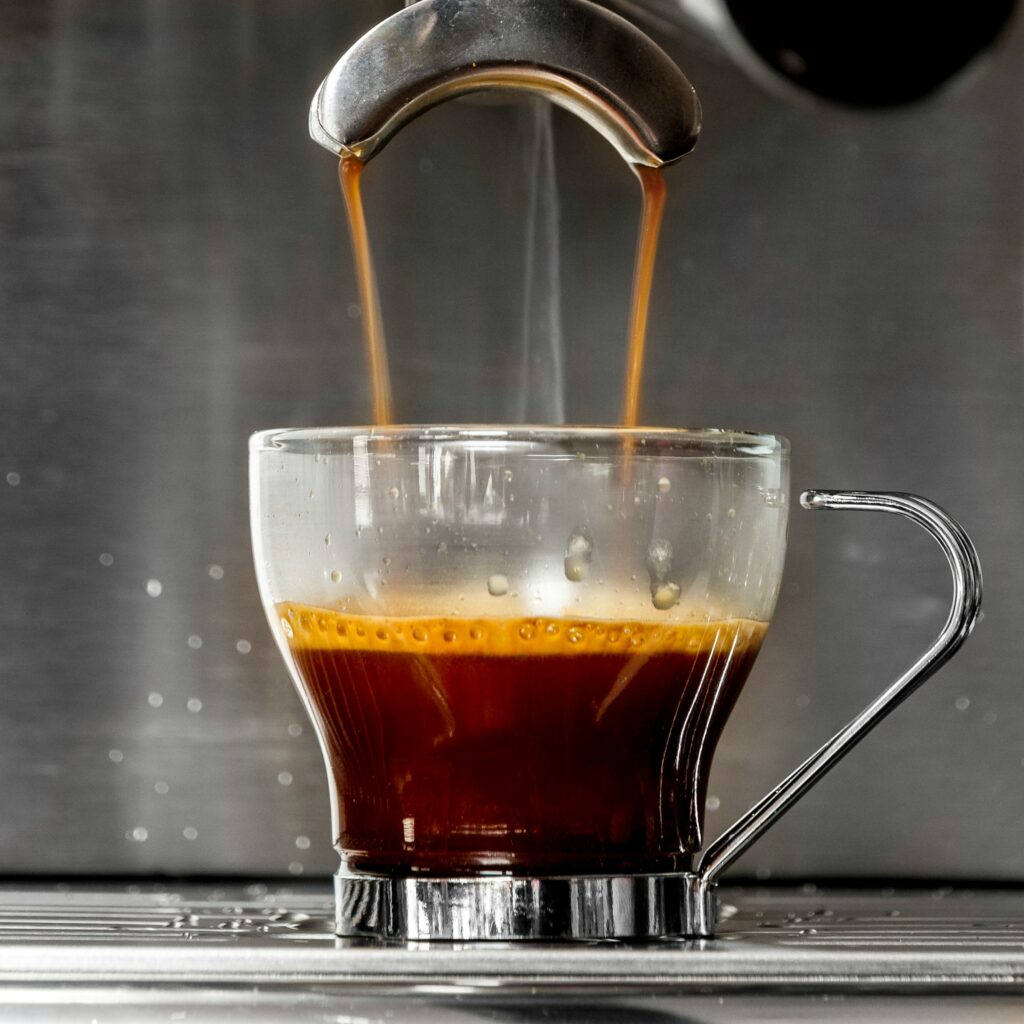
Pulling Your First Espresso Shot
After preparing your coffee with precision, it’s time to bring everything together and pull your first espresso shot.
This moment is where the magic happens, transforming water and coffee into a rich, aromatic delight.
Steps to Insert the Portafilter and Start the Extraction
- Secure the Portafilter: Once you’ve tamped the coffee, twist the portafilter into the group head until it’s firmly in place. Ensure it’s locked in securely to prevent any water from escaping during extraction.
- Start the Extraction: Depending on your Breville model, you may have a button for a single shot or a double shot. Press the appropriate button to start the extraction process. The machine will begin to pump hot water through the coffee grounds.
- Monitor the Shot: Place a pre-warmed espresso cup under the portafilter to catch the espresso. Watch as the first drops appear, which should be a slow, steady stream, not a fast drip or a gush.
Understanding Extraction Time and How to Adjust Settings for the Perfect Shot
- Ideal Extraction Time: For most espresso machines, including Breville, the ideal extraction time is between 25 to 30 seconds for a double shot. If your shot falls significantly outside this range, adjustments are needed.
- Adjusting the Grinder: If the shot is too fast (under-extraction), make the grind finer. If it’s too slow (over-extraction), make the grind coarser. Small adjustments can make a big difference.
- Adjusting the Dose: Altering the amount of coffee can also affect the extraction time. More coffee can slow down the extraction, while less can speed it up. Aim for 18-20 grams for a double shot as a starting point.
Tips for Diagnosing and Improving Your Espresso Shots
- Blonding: Watch for the color of the espresso as it extracts. It should start dark and then gradually lighten. If it lightens too quickly (blonding), this indicates over-extraction.
- Taste Test: The best way to judge your espresso is by tasting it. It should be rich and balanced, not too bitter (over-extracted) or sour (under-extracted).
- Record Keeping: Keep notes on your adjustments and the results. This can help you replicate the perfect shot once you find the right settings for your taste.
- Consistency is Key: Ensure your tamping pressure and the amount of coffee used are consistent from shot to shot. This helps isolate variables when adjusting settings.
Milk Frothing Techniques
Mastering milk frothing is essential for creating a wide range of espresso-based drinks.
The texture and temperature of your milk can transform a simple espresso into a luxurious latte or cappuccino.
Here’s how to perfect your milk frothing technique using the steam wand on your Breville espresso machine.
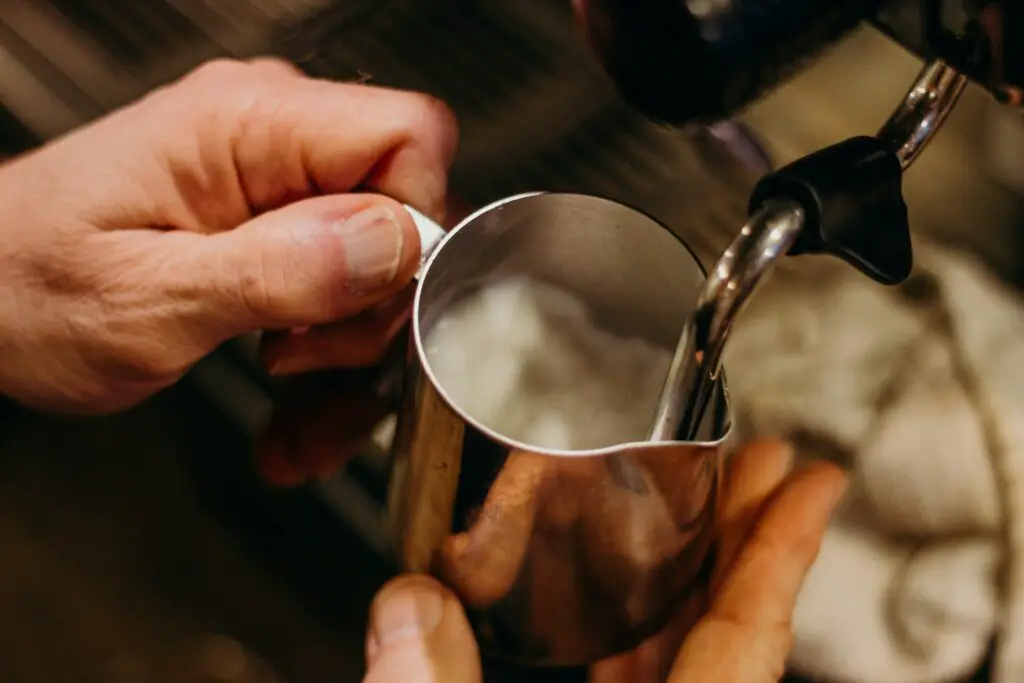
How to Use the Steam Wand for Perfect Milk Texture
Preparation
Start with cold milk in a metal frothing pitcher.
The amount of milk should be enough for your drink, but not so much that it spills over when frothing.
Whole milk is recommended for its fat content, which creates richer foam.
Purge the Wand
Before inserting it into the milk, turn on the steam for a few seconds to purge any water residue in the wand.
This ensures you’re starting with pure steam.
Positioning the Wand
Submerge the tip of the steam wand just below the surface of the milk, slightly off-center.
This positioning helps create a whirlpool effect, essential for breaking up large bubbles and creating smooth microfoam.
Frothing the Milk
Turn on the steam to its highest setting.
As the milk begins to froth, slowly lower the pitcher to keep the wand tip just below the surface.
Listen for a consistent hissing sound, indicating that air is being incorporated into the milk.
Temperature
Use your hand to gauge the temperature of the pitcher.
Once it becomes too hot to touch comfortably (around 140-150°F or 60-65°C), it’s time to stop steaming.
Overheating the milk can result in a burnt taste.
Differences in Frothing Milk for Lattes vs. Cappuccinos

Latte Milk
For lattes, aim for silky, slightly frothed milk with minimal bubbles.
The goal is to create a smooth texture that blends seamlessly with the espresso, producing a creamy drink.
Achieve this by introducing less air at the beginning of the frothing process.
Cappuccino Milk
Cappuccinos require more froth and volume than lattes.
Introduce air longer during the frothing process to create a thick, velvety foam that stands up on top of the espresso.
The ideal cappuccino has equal parts espresso, steamed milk, and milk foam.
Cleaning the Steam Wand After Use
Proper cleaning of the steam wand after each use is crucial for maintaining hygiene and ensuring the longevity of your machine.
- Purge Again: Immediately after frothing, turn on the steam for a few seconds to blow out any milk residue inside the wand.
- Wipe Down: Use a damp cloth to clean the exterior of the wand thoroughly. Be careful, as the wand may still be hot.
- Deep Clean: Regularly, remove any detachable parts of the steam wand and soak them in warm, soapy water. Use a small brush to clean the inside of the wand if accessible.
Cleaning and Maintenance
To ensure your Breville espresso machine continues to produce the perfect espresso and operates efficiently for years to come, regular cleaning and maintenance are essential.
Here’s how to keep your machine in top condition through daily routines and periodic descaling.
Daily Cleaning Routines
After Each Use
Immediately after brewing and milk frothing, purge the steam wand and wipe it with a damp cloth.
Rinse the portafilter and basket under hot water to remove coffee residue.
If your machine has a drip tray, empty and rinse it daily.
Group Head Cleaning
Daily, or after each use if possible, run a water cycle without coffee in the portafilter to clean the group head.
Some machines come with a cleaning disc for a more thorough cleaning; use this with a cleaning tablet as directed in your manual.
Exterior Wipe Down
At the end of the day, use a soft, damp cloth to wipe down the machine’s exterior.
Avoid using abrasive cleaners or pads that can scratch the surface.
Descale Process for Long-term Maintenance
Over time, mineral deposits from water can build up in your machine’s internal components, affecting its performance and the taste of your coffee.
Descale your machine every 2-3 months, or more frequently if you use it heavily or have hard water.
Prepare the Descale Solution
Use the descaling solution recommended by Breville or a mixture of water and white vinegar as an alternative.
Fill the water tank with the solution.
Run the Descale Cycle
Follow the instructions in your machine’s manual to start the descale process.
This usually involves running the solution through the machine and letting it sit for a period to break down the mineral deposits.
Rinse Thoroughly
After descaling, refill the tank with fresh water and run it through the machine several times to rinse out any remaining solution.
Ensure the water runs clear before making coffee again.
Importance of Regular Cleaning for Machine Performance and Longevity
Prevents Malfunctions
Regular cleaning prevents the buildup of coffee oils and residues that can clog the machine’s filters and tubes, leading to malfunctions or poor espresso quality.
Enhances Flavor
A clean machine is crucial for maintaining the pure flavor of your coffee.
Residues from old coffee can impart bitter flavors to your brew.
Extends Machine Life
By keeping your machine clean and descaled, you reduce the risk of corrosion and wear on its internal components, extending its lifespan and ensuring it remains a valuable part of your coffee routine for years.
Troubleshooting Common Issues
Even with meticulous care and maintenance, you might encounter some issues with your Breville espresso machine.
Here’s how to troubleshoot common problems and understand when it’s time to seek professional service.
Addressing Common Problems
Machine Not Heating
If your espresso machine doesn’t seem to be heating up, first ensure it’s properly plugged in and the power source is functioning.
Check the machine’s settings to make sure it’s not set to an energy-saving mode that might be preventing heating.
If these steps don’t resolve the issue, the machine’s heating element may be malfunctioning and require professional attention.
Poor Espresso Quality
Several factors can contribute to poor espresso quality, including grind size, tamping pressure, and the freshness of your coffee beans.
If your espresso is too weak or watery, try using a finer grind size or increasing the amount of coffee.
If the espresso is too bitter, adjust to a coarser grind or use less coffee.
Ensure you’re tamping the grounds evenly with the right amount of pressure.
Also, always use fresh, high-quality beans for the best flavor.
Low Pressure During Extraction
If you notice the pressure gauge is not reaching the optimal extraction range, ensure the water tank is adequately filled and the machine is properly heated.
Check if the coffee grind is too coarse or if you’re not using enough coffee, as both can lead to low pressure.
Cleaning the portafilter and the basket to remove any clogs and ensuring a proper seal can also help.
Milk Not Frothing Properly
Ensure the steam wand is clean and not clogged.
Use cold, fresh milk and the correct pitcher technique to create a whirlpool effect when frothing.
If the problem persists, the steam wand might need descaling or there could be an issue with the machine’s steam pressure that requires professional service.
When to Seek Professional Service
- Persistent Heating Issues: If troubleshooting doesn’t resolve heating problems, the machine’s internal components might be at fault. Professional service is recommended to address electrical issues safely.
- Water Leakage: Any unexplained water leakage from the machine should be professionally assessed. Leaks can indicate seal failures or cracks in the water lines.
- Grinder Malfunctions: If the built-in grinder stops working or doesn’t grind coffee beans consistently despite cleaning and adjustments, the grinder’s mechanism might be damaged.
- Repeated Descale Alerts: If your machine continues to indicate it needs descaling even after you’ve completed the process, there could be a buildup that’s too significant for a standard descale or a sensor issue.
In many cases, consulting the user manual or Breville’s customer support can help resolve common issues.
However, for persistent problems or anything that involves the machine’s internal electronics or mechanics, it’s best to seek professional service.
Continuing to use a malfunctioning espresso machine can lead to further damage or, worse, safety hazards.
Remember, regular maintenance and prompt attention to any issues will keep your Breville espresso machine brewing perfect shots for years to come.
Advanced Tips and Tricks
Once you’ve mastered the basics of using your Breville espresso machine, it’s time to elevate your coffee-making skills with some advanced techniques.
Experimenting with different beans, mastering pre-infusion, and creating latte art can transform your home espresso into a truly artisanal experience.
Experimenting with Different Coffee Beans and Grind Sizes
Diverse Coffee Beans
The world of coffee beans is vast and varied.
Experimenting with beans from different regions can significantly alter the flavor profile of your espresso.
Each type of bean has its unique characteristics, from fruity African beans to nutty South American varieties.
Don’t be afraid to try blends or single-origin beans to discover your preference.
Grind Size Adjustments
The grind size of your coffee beans is crucial in extracting the perfect espresso shot.
A finer grind results in a slower flow rate and a stronger espresso, while a coarser grind produces a faster shot and a lighter taste.
Experiment with slight adjustments to the grind size to find the sweet spot for each type of bean you use.
Remember, the fresher the grind, the better the espresso.
Enhancing Your Espresso Shots with Pre-infusion Techniques
Understanding Pre-infusion
Pre-infusion is a technique where a small amount of water is gently applied to the coffee grounds before full extraction.
This process helps to evenly saturate the grounds, leading to a more balanced and consistent espresso shot.
Implementing Pre-infusion
Some Breville machines come with a built-in pre-infusion feature.
If yours does, refer to the manual to learn how to activate it.
For machines without automatic pre-infusion, you can manually mimic the process by pressing the extraction button to release a small amount of water, then pausing for a few seconds before continuing the shot.
Creating Latte Art

Perfecting Milk Texture
The key to creating beautiful latte art lies in the milk’s texture.
Aim for silky, microfoam milk with tiny, uniform bubbles.
This is achieved by keeping the steam wand just below the milk’s surface to introduce air until the milk reaches about 100°F (38°C), then submerging the wand deeper to create a whirlpool effect until the temperature reaches 140-150°F (60-65°C).
Pouring Techniques
Start by pouring the steamed milk into the center of your espresso from a low height.
Once the cup is about half full, gently shake the pitcher back and forth while slowly moving it in a circular motion.
As the foam begins to surface, lift the pitcher slightly and draw it through the center of the design to create your desired pattern.
Practice Makes Perfect
Latte art requires patience and practice.
Start with simple designs like a heart or rosetta and gradually progress to more complex patterns.
Don’t be discouraged by initial failures; even professional baristas spend a considerable amount of time perfecting their art.
Conclusion
Mastering your Breville espresso machine is an art that combines precision, patience, and a passion for quality coffee.
From the initial setup and daily maintenance to experimenting with grind sizes and practicing latte art, each step is crucial for crafting the perfect espresso shot.
Remember, the journey to becoming a home barista is as rewarding as the delicious espresso you create.
Embrace the learning curve, experiment with different techniques, and most importantly, enjoy the process.
With your Breville machine by your side, every cup is an opportunity to explore the rich and diverse world of espresso right from the comfort of your home.
FAQ’s
How long do you brew espresso in a Breville machine?
The ideal brew time for espresso in a Breville machine is between 25 to 30 seconds for a double shot.
This timing starts from the moment you activate the pump until the espresso finishes extracting.
How do you froth milk in a Breville?
To froth milk in a Breville machine, fill a cold pitcher with cold milk no more than halfway.
Purge the steam wand before submerging its tip slightly below the milk’s surface.
Turn on the steam and gently raise the pitcher as the milk expands to create smooth, microfoam milk ideal for lattes and cappuccinos.
How to use Breville espresso machine cleaning tablets?
Insert a cleaning tablet into the portafilter (using a cleaning disc if provided) and lock it into the group head. Select the cleaning cycle as per your machine’s manual.
Once the cycle completes, run a water cycle without the tablet to rinse.
Why is my Breville espresso bitter?
Bitter espresso usually results from over-extraction, which can happen if the grind is too fine, the coffee is tamped too hard, or the water passes through the coffee for too long. Adjusting the grind size coarser and ensuring proper tamping pressure can help.
Can you use pre-ground coffee in the Breville espresso machine?
Yes, you can use pre-ground coffee in a Breville espresso machine, though for optimal freshness and flavor, grinding coffee beans just before brewing is recommended.
How to adjust the grind size on Breville Barista Express?
Adjust the grind size by turning the grind size dial on the side of the machine.
A lower number produces a finer grind, while a higher number results in a coarser grind.
Start with the recommended setting and adjust based on your espresso’s taste and extraction time.
What size is a Breville portafilter?
The standard size for a Breville portafilter is 54mm, which is slightly smaller than the commercial standard of 58mm.
How long does a Breville espresso machine last?
With proper maintenance and regular cleaning, a Breville espresso machine can last between 5 to 10 years, depending on the model and usage.