Unlock the rich and enticing aroma of freshly roasted coffee beans right in the comfort of your own home!
We’ll guide you through the art of coffee bean roasting, revealing the essential steps and pro tips to achieve a perfect roast every time.
Awaken your senses and embark on a delightful coffee adventure as we explore the rewarding process of roasting coffee beans from scratch.
Let’s dive in and discover the secrets to brewing a cup of joe that’s truly one-of-a-kind!
The Perks of Home Coffee Roasting
Roasting coffee beans at home comes with a host of benefits that will elevate your coffee experience to new heights.
First and foremost, the flavor achieved through home roasting is truly exceptional and guaranteed to delight your taste buds.
Since coffee is at its peak flavor immediately after roasting, the freshness you savor from home-roasted beans ensures an authentic and gratifying coffee indulgence.
The allure of home roasting lies in the level of control it grants you over the coffee’s taste and aroma.
Tailor your brew precisely to your preferences by handpicking the beans, adjusting the roast level, and experimenting with various brewing techniques.
The result is a personalized cup of coffee that perfectly aligns with your unique palate.
Not only does home roasting cater to your taste buds, but it also offers a budget-friendly approach to enjoying premium coffee.
Unroasted green coffee beans are generally more affordable than their pre-roasted counterparts, and roasting only the required amount minimizes wastage, ensuring a cost-effective coffee experience.
Moreover, adopting a home coffee roasting routine can also contribute to a greener planet.
By roasting your own coffee, you significantly reduce waste, making a positive impact on the environment.
Additionally, investing in an energy-efficient roaster further lessens emissions, allowing you to savor your coffee with a clear conscience.
Exploring the Art of Home Coffee Roasting: Various Methods Unveiled
In this section, we will introduce you to a variety of roasting techniques that will enable you to tailor and refine your coffee bean roasting process.
Let’s take a look at them.
Method #1: Oven Roasting
Roasting coffee beans in the oven presents a delightful and accessible way to relish the goodness of freshly roasted coffee from the comfort of your home.
This is why we’ve chosen this to be our #1 method of coffee roasting as it is really simple to do and requires minimal human involvement.
If you’re eager to try this method, follow these simple steps to achieve a perfect roast:
Step 1: Preheat and Prepare
Set your oven to a temperature ranging between 450 and 500 degrees Fahrenheit.
The specific temperature may vary depending on your oven type, but this range generally works well for oven roasting.
Step 2: Spread and Space
Arrange the coffee beans evenly on a cookie sheet, ensuring they are not stacked on top of each other.
Ample spacing guarantees uniform roasting.
Step 3: Bake and Monitor
Roast the beans for approximately 12-15 minutes, keeping a close eye on their progress and color during the initial stages.
If necessary, briefly take the beans out, stir them, and swiftly return them to the oven without losing too much heat.
Step 4: Perfect Your Roast
Once the beans reach your desired roast level, remove the pan from the oven and transfer the beans to a metal colander.
Shake the colander to eliminate any chaff or loose skin from the beans.
Step 5: Cool and Store
Allow the beans to cool for a few minutes before transferring them to an airtight container for storage.
A word of caution
Ovens and baking trays may not distribute heat equally, leading to potential unevenness in the roast.
To address this, keep a keen eye on the process and stir the beans if needed.
However, minimize opening the oven door too frequently, as it can cause temperature fluctuations.
Method #2: Pan Roasting
Roasting coffee beans in a pan offers an effortless and economical approach to relishing delicious coffee right in the comfort of your home.
Follow these step-by-step instructions to achieve a satisfying pan-roasted coffee experience:
Materials
- A pan (preferably cast iron)
- A stirring utensil (like a bamboo spatula)
- Unroasted or green coffee beans
- A mesh sieve or colander
- An airtight container for storage
Instructions
Step 1: Heat the Pan
Place the pan on your stove and set the heat to high, allowing the pan to reach around 500 degrees Fahrenheit.
To minimize smoke, use a vent hood fan or consider roasting outdoors.
Step 2: Measure the Beans
Weigh out the coffee beans, aiming to cover the pan’s bottom without filling it so much that stirring becomes difficult.
Step 3: Roast and Stir
Pour the coffee beans into the preheated pan and stir continuously to prevent scorching.
Keep the beans in motion throughout the roasting process.
Step 4: Observe and Listen
Watch for changes in the beans’ color and listen for the distinct “first crack” sound, which occurs when the beans expand and release moisture.
Roasting typically takes 5 to 10 minutes, depending on your desired roast level.
Step 5: Cool and Remove Chaff
Once the beans reach your preferred roast level, transfer them to a mesh sieve or colander for cooling.
Shake the sieve or colander to remove any remaining chaff from the beans.
Step 6: Store and Savor
Allow the beans to cool to room temperature before storing them in an airtight container for future use.
Important To Note
It’s essential to be mindful of the smoke produced during pan roasting, ensuring adequate ventilation while roasting indoors.
Achieving a consistent roast level might require some practice, but with patience and experimentation, you’ll soon enjoy the delightful taste of freshly pan-roasted coffee beans at home.
Method #3: Popcorn Popper
In this unexpected yet efficient method, we’ll utilize an old-fashioned popcorn popper to roast coffee beans, delivering delightful results in just 5 to 10 minutes.
Let’s dive into the detailed step-by-step instructions:
Materials Needed
- Popcorn popper with a metal popping chamber and side air vents
- Green coffee beans
- Wooden spoon
- Soup can (optional)
- Outdoor space with an electrical outlet
- Stovetop fan or hood (optional)
Steps
Step 1: Preheat the Popper
Turn on the popcorn popper and allow it to preheat for a few minutes.
Step 2: Measure and Add Beans
Measure the desired amount of green coffee beans, typically starting with 60-75 grams for smaller popcorn poppers.
Pour the beans into the popper.
Step 3: Initiate Roasting
Switch on the popcorn popper and start the timer.
Step 4: Listen for the First Crack
Around 3-5 minutes into the roasting process, listen for the first crack, resembling the sound of popcorn popping.
Step 5:Determine Roast Level
For a lighter roast, stop the process after the first crack.
If a darker roast is preferred, continue roasting until the second crack, this will sound like Rice Krispies popping.
Step 6: Stir for Even Roasting
Using a wooden spoon, stir the beans for 5 seconds every 15 seconds to ensure uniform roasting.
Step 7: End Roasting and Cool
Once the desired roast level is achieved, turn off the popcorn popper and unplug it.
Pour the roasted beans into a colander or sieve to remove the chaff.
Allow the beans to cool for at least 30 minutes before grinding and brewing.
Important To Note
It’s essential to be mindful of the smoke produced during the roasting process, making outdoor roasting preferable if feasible.
Keep in mind that popcorn poppers are not designed for coffee roasting, so this method may void the manufacturer’s warranty.
Nevertheless, it serves as an excellent starting point for home roasting and can yield delicious coffee results.
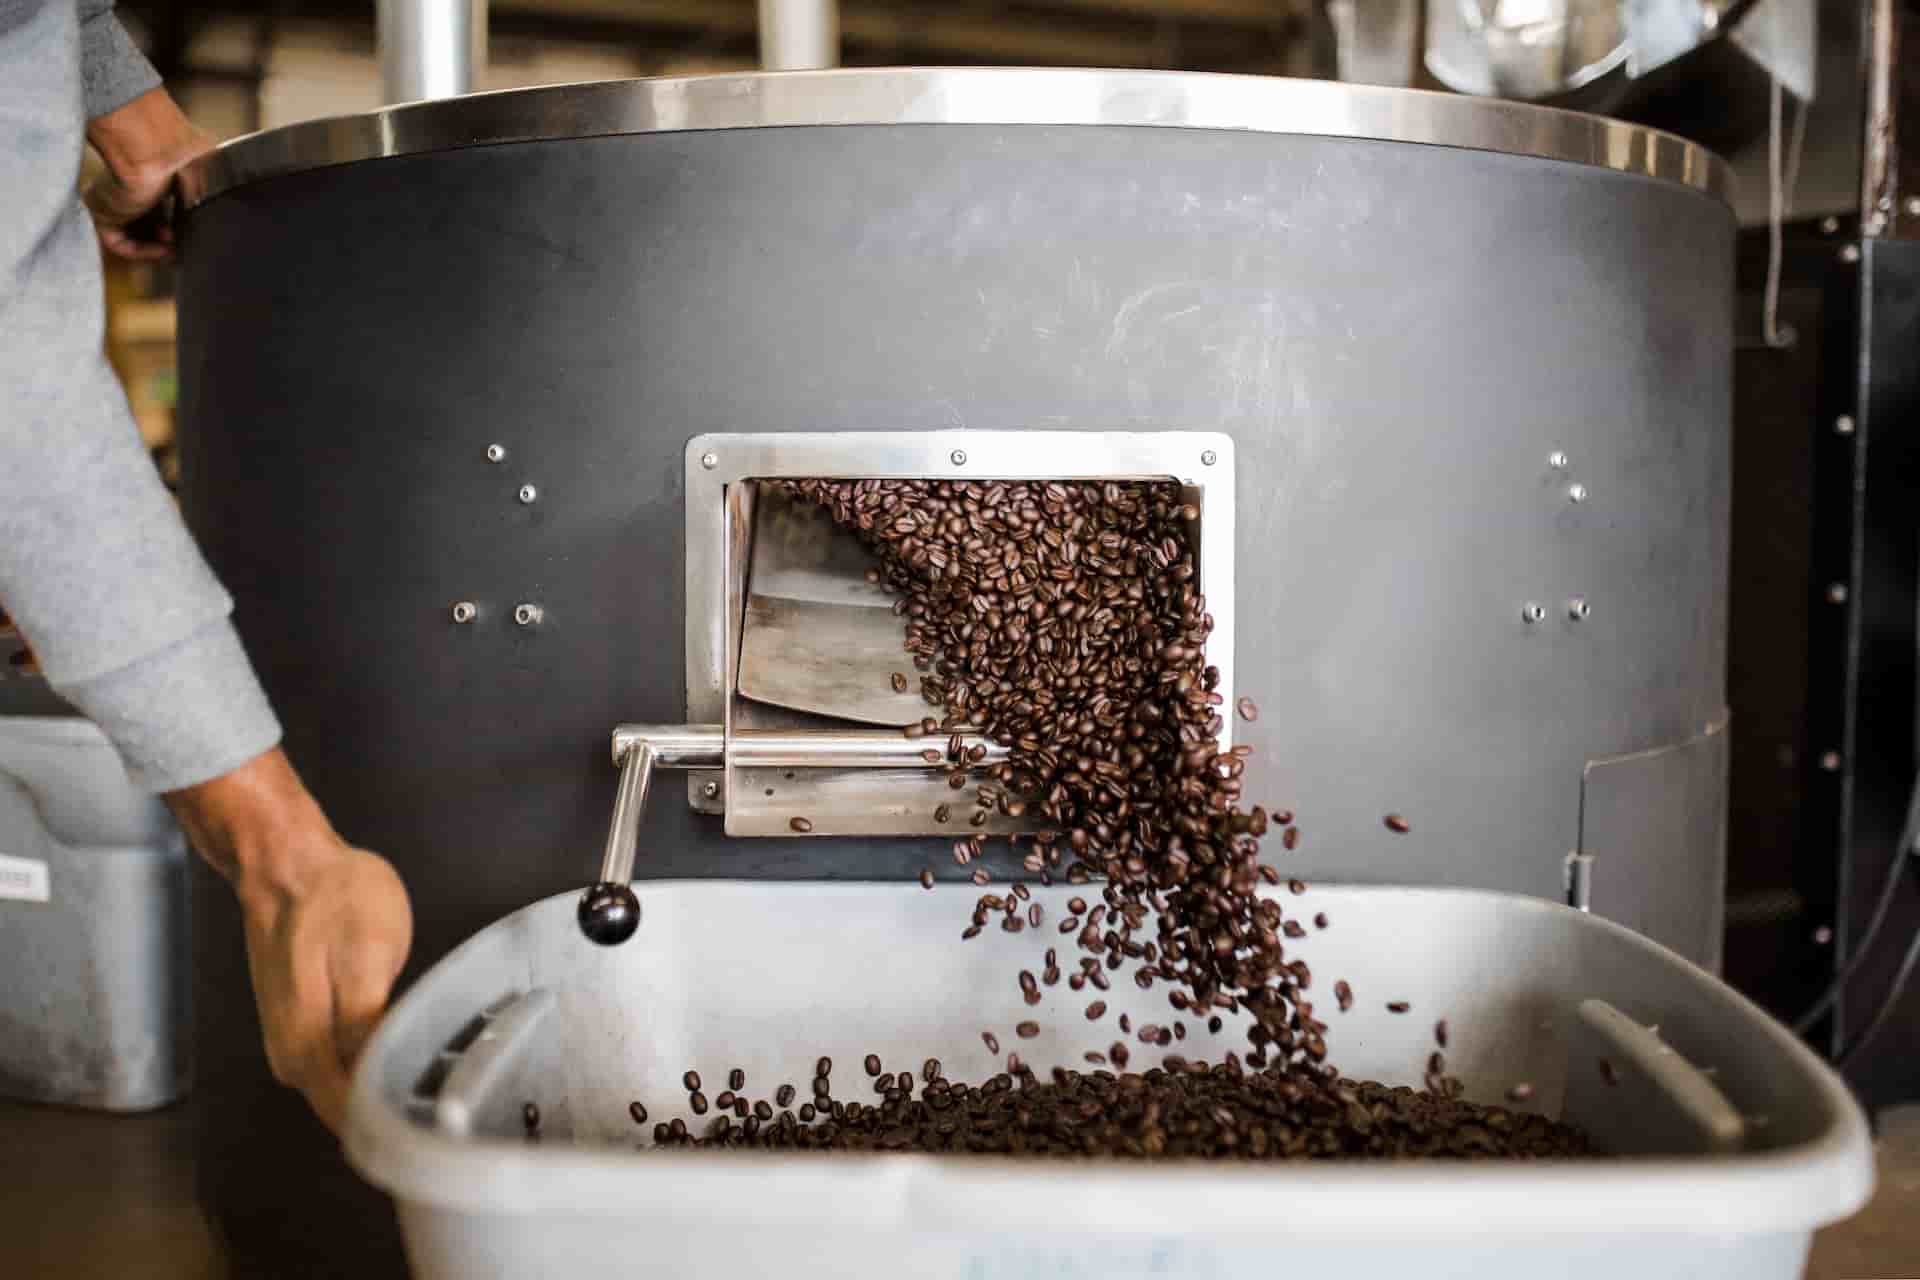
Method #4: Coffee Roaster
If you’re seeking unparalleled control over your coffee bean roasting journey, a purpose-built home coffee roaster is the ultimate solution.
While these high-quality machines can range from $150 to $500 or more, they offer superior temperature control, precise airflow, and effective chaff collection.
Investing in a dependable coffee roaster ensures consistent roasts with even coloration, free from scorching or tipping, delivering exceptional results that stand the test of time.
Now, let’s explore the detailed steps for roasting coffee beans in a coffee roaster:
Step 1: Prepare the Coffee Roaster
Ensure your coffee roaster is clean and ready for use.
Step 2: Add Green Coffee Beans
Measure the desired amount of green coffee beans and follow the manufacturer’s instructions to add them to the coffee roaster.
Step 3: Cover & Heat
Close the roaster’s lid and set the temperature dial to the recommended starting temperature, usually around 140°C (285°F), initiating the roasting process.
Step 4: Roast Until Beans Turn Yellow
Allow the beans to roast until they transition from green to yellow and emit a grassy aroma.
Typically, this stage takes about 14 minutes, but timings may vary based on your roaster.
Step 5: Turn up the Heat for First Crack
Increase the temperature dial to around 180°C (355°F).
Continue roasting until you hear the distinct cracking noise known as the first crack, which usually occurs after about 12 minutes, indicating the caramelization of sugars inside the beans.
Step 6: Continue Roasting to Desired Level
At the first crack, you can opt to stop for a light roast or continue roasting for a darker profile.
Adjust the temperature dial accordingly and continue roasting until your preferred roast level is achieved.
Step 7: Cool the Roasted Beans
Once your desired roast level is reached, remove the beans from the coffee roaster and transfer them to a cooling tray or colander.
Allow the beans to cool completely before grinding or storing them.
Important To Note
Remember that specific instructions might differ based on your coffee roaster model, so always refer to the manufacturer’s guidelines for accurate roasting.
Additionally, be mindful of the smoke produced during the roasting process and ensure proper ventilation in your roasting area.
Understanding the Significance of Degassing
Degassing holds a crucial role in the coffee roasting process, addressing the build-up of gases, primarily carbon dioxide, within freshly roasted beans.
Allowing these gases to escape is essential as an excess of carbon dioxide can adversely impact coffee flavor by causing uneven extraction.
The degassing period varies, typically spanning 2 to 12 days, contingent on coffee type and roast level.
Darker roasts degas faster than lighter ones and longer roasts tend to degas more rapidly than shorter ones.
Finding the optimal degassing time depends on factors like harvesting methods, processing techniques, bean size, and planned brewing methods.
The act of grinding roasted beans accelerates degassing, with finer grind sizes resulting in even higher rates of gas release.
It’s important to distinguish degassing from resting—the latter refers to letting the beans sit after roasting to develop flavors fully.
Embracing patience is key in the degassing process.
Waiting to grind and storing the beans appropriately ensures the finest possible coffee taste and a rewarding brewing experience.
To craft an exquisite cup of coffee, remember that degassing plays a pivotal role in honing the flavor profile and achieving a truly delightful brew.
Unveiling the Roasting Process: From Green to Flavorful Brown Coffee Beans
The roasting process is a captivating transformation that turns green, unroasted coffee beans into the familiar and aromatic brown beans we adore.
This intricate process involves subjecting the beans to high temperatures, initiating chemical reactions that shape the beans’ flavor, aroma, and color.
Comprising three distinct stages—drying, browning, and development—the roasting journey unfolds to create the perfect cup of coffee.
1. Drying Stage
In this initial phase, the beans shed moisture, a crucial step that paves the way for flavor development in subsequent stages.
2. Browning Stage (Maillard Stage)
As the beans progress, the Maillard stage kicks in, where they undergo browning, and aromatic compounds start to form, imparting captivating scents.
The browning stage of coffee beans comes to an end when they experience their first crack due to the pressure inside them, resulting in a series of popping sounds that can be easily recognized.
3. Development Stage
In the final stage, the beans are roasted to their desired level, fully developing the flavor and aroma.
As time goes on, the moisture within the beans gradually evaporates until they reach the point of a second crack.
The roasting duration typically ranges from 8 to 20 minutes, depending on roaster size and bean variety.
Temperature and Time
Two critical factors define the roast profile and taste characteristics.
The roast profile, determined by temperature and roasting time, varies based on the bean type.
For small batch roasters, the roasting duration typically spans 15-30 minutes, with temperatures ranging from 180 to 250°C.
Chemical Alchemy
During the roasting process, rapid exposure to high temperatures triggers profound chemical changes within the beans.
Timing is crucial, and the beans are promptly cooled to halt the process once they reach their peak of perfection.
An Art and Science
Roasting is both an art and a science, and mastering it demands years of training to achieve various roast levels.
An expert roaster possesses the finesse to craft a diverse array of flavors, unlocking the full potential of each batch.
Avoiding Common Pitfalls With Home Roasting
Roasting green coffee beans at home is a rewarding adventure, but avoiding common mistakes is essential to achieving exceptional coffee flavor and quality.
Follow these tips to sidestep home roasting errors:
Preheating Your Equipment
Ensure proper preheating of your roasting equipment to achieve even and consistent roasts.
Taking Notes
Keep detailed records of each roast, including bean type, roast time, temperature, and relevant details to replicate successful roasts and avoid future mistakes.
Ensuring Sufficient Agitation
Maintain constant bean movement during roasting to prevent uneven roasting and burnt beans.
Avoiding Scorching
To prevent scorching, opt for slower roasting, lower temperature settings, and increase drum rotation speed for even heat distribution.
Balancing Roast Levels
Adjust temperature and roasting time to strike the perfect balance between under-roasting (resulting in sour and grassy flavors) and over-roasting (leading to burnt and bitter flavors).
Optimizing Roaster Capacity
Follow manufacturer guidelines for maximum bean capacity to avoid uneven roasting and burnt beans caused by overloading.
Understanding Your Green Coffee
Gather essential information about the green coffee’s origin, elevation, processing, and environment to tailor your roasting process accordingly.
Consistent Practice
Mastering coffee roasting demands practice.
Continuously hone your skills, take notes, and experiment with various green beans to refine your technique.
Conclusion
Mastering the art of roasting coffee beans at home opens up a world of delightful possibilities.
With various methods to choose from, each offering its unique charms, you can personalize your coffee experience like never before.
From the simple joy of oven and pan roasting to the precision of coffee roasters, exploring these techniques empowers you to unlock the full potential of every bean.
Remember to avoid common mistakes, take notes, and be patient during the degassing process.
Embrace the journey of trial and discovery, refining your roasting skills with each batch.
The aroma of freshly roasted coffee filling your home will be a testament to your passion and dedication.
FAQ’s
Is it worth it to roast your own coffee?
Absolutely! Roasting coffee beans at home offers a host of benefits.
You get to enjoy the freshest coffee flavors, customize the roast level to your preference, and explore a world of unique coffee profiles.
Additionally, home roasting can be cost-effective and environmentally friendly, making it a rewarding and fulfilling experience for coffee enthusiasts.
How long does it take to roast coffee beans?
The roasting time varies based on the chosen method and roast level.
Generally, coffee beans can be roasted in as little as 8 to 20 minutes, with smaller batch roasters taking around 15 to 30 minutes.
Factors like bean type and roast level influence the duration. Darker roasts and longer roasts usually require less time for roasting.
What are the disadvantages of coffee roasting?
Roasting coffee requires practice and knowledge to achieve consistent and desirable results.
Investing in quality roasting equipment can be costly, and some methods may produce smoke, necessitating proper ventilation.
Additionally, roasting can void the warranty of certain appliances not designed specifically for coffee roasting.
How long after roasting is coffee best?
For the best-tasting coffee, most baristas recommend consuming your coffee beans within 7 to 21 days after the stated roast date.
How long will unroasted coffee beans last?
Unroasted, or green, coffee beans have a longer shelf life compared to roasted beans.
When stored properly in a cool, dry, and airtight container, green coffee beans can last for several months to a year or more.
However, their flavor and quality will gradually deteriorate over time, so it’s best to use them within six months for the most enjoyable cup of coffee.